If this information helps you, please pay it forward, and share this article with others who may be experiencing the same problem. Your help in sharing will be appreciated, and karma will prevail!
For those attempting to recover lost or accidentally deleted photos or videos, see this linked article instead. For those who've simply forgotten their card's password, scroll down to the bottom of this current article. For those that have taken many previous photos with the card, but suddenly your camera or computer wishes to "format" the card, see the "corrupted card procedures" located near the bottom of this linked article instead. For those with Compact Flash (CF) cards, please see this article instead. Finally, for those that are still here with SD card problems, please continue reading.
For those attempting to recover lost or accidentally deleted photos or videos, see this linked article instead. For those who've simply forgotten their card's password, scroll down to the bottom of this current article. For those that have taken many previous photos with the card, but suddenly your camera or computer wishes to "format" the card, see the "corrupted card procedures" located near the bottom of this linked article instead. For those with Compact Flash (CF) cards, please see this article instead. Finally, for those that are still here with SD card problems, please continue reading.
First of all, here's a video summary of the steps. But please remember to also read each of the Fixes listed in the article, along with user comments as they contain additional tips that the video doesn't cover.
Video: SD Card Problems and Fixes
FIX 1: I know that you probably already have checked the card's slide switch, but I just want to first present this for others with the same problem who may not be aware of this switch. Other options besides the slide switch are presented further in this article.
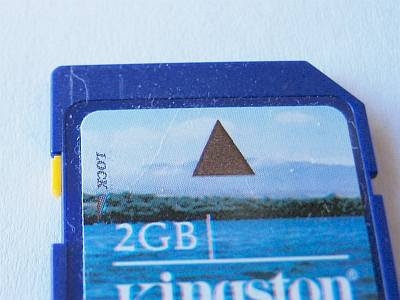
Please check to make sure that you didn't accidentally place the tiny locking slide switch on the side of your SD card in the "locked" downward position. The correct "unlocked" position should be slid up toward the direction of the connectors. If you discover that the locking switch is actually missing or has broken off, proceed directly below to Fix #4a.
Please check to make sure that you didn't accidentally place the tiny locking slide switch on the side of your SD card in the "locked" downward position. The correct "unlocked" position should be slid up toward the direction of the connectors. If you discover that the locking switch is actually missing or has broken off, proceed directly below to Fix #4a.
Card Switch in Downward "Locked" Position
FIX 2: Old cameras and the card readers on older computers just can't read 4GB or higher SDHC cards. If this problem is just happening after purchasing a brand new card, AND your camera is an older camera (about 2008 or older), I'm going to guess that you just bought a new 4GB or larger SDHC card. If the above is true, continue reading. If not true, skip to Fix 3.
Although the SDHC card looks exactly the same as a standard SD card, the format the card uses is very different. Unfortunately your older camera was likely designed before the SDHC format came out. Sorry, but a SDHC card may not work with your older camera (check your camera maker's website for your model). You probably will need to use standard SD cards only (usually those 2GB or less). They're relatively inexpensive these days, and can easily be found on Amazon if your local store doesn't carry less than 4GB cards.
SDHC Card (Left) vs. Standard SD Card (Right)

FIX 3: If you've had the card for a while, but it just recently started to show "memory card error" or "card requires formatting", ask yourself if you can ever remember formatting your card IN THE CAMERA. If you can't remember doing such (or don't know what a format is) continue reading. But if the description above doesn't apply to you, skip to Fix 4.
An unformatted card will initially work fine in a camera, but eventually will corrupt with time, especially after many files have been saved and deleted. A card can also corrupt if camera power is interrupted during the write process (such as changing batteries or batteries dying while the card is still writing the last picture taken). Formatting the card in the camera will correct both these problems, BUT it will also erase all photos on the card. AFTER you've recovered any important photos (please see this other article from this blog that shows how to recover your photos from a corrupted card), format the card in your camera to prevent this from happening again (dig out your instruction manual to figure out how). Stating this once again, formatting will also totally erase your card, so only do this after you've recovered and saved to your computer any important photos from the card.
FIX 3A: If file corruptions are occurring occassionally or intermittently (such as for every few files or movies taken, the camera states "file unrecognized" or something similar), take a close look at your card to determine its "Class", or in other words its write speed. Written on the face of the card should be the word Class with a number, or a number circled with a capital "C". See the above photo for an example of a Class 6 card (on the left), with an older/slower unmarked card on the right. If neither "Class" or "C" is written, the card is likely Class 2 or lower. Today's newer cameras take very high-resolution pictures, AND high-definition videos. File sizes can be very large. Some of the older SD cards just cannot keep up with the write speed required to save these files before you're ready to take another picture. As a result, some of your files can become corrupted if you're using older cards with newer cameras. The fix in this case is to purchase a higher speed card for your newer high-performance camera (recommend Class 6 or better). Or you can also wait a few seconds between shots/videos before switching modes or taking another picture (to ensure the write is completed), but that can get to be annoying after a while.
FIX 3B: Again, if file corruptions occur intermittently, AND you use a card reader, do you remove the card properly from the reader? When ejecting a memory card from its reader, recommend that you always select the "Safely Remove Hardware and Eject Media". This selection is located in the bar in the lower right-hand corner of your computer screen (if using a PC).
FIX 3B: Again, if file corruptions occur intermittently, AND you use a card reader, do you remove the card properly from the reader? When ejecting a memory card from its reader, recommend that you always select the "Safely Remove Hardware and Eject Media". This selection is located in the bar in the lower right-hand corner of your computer screen (if using a PC).
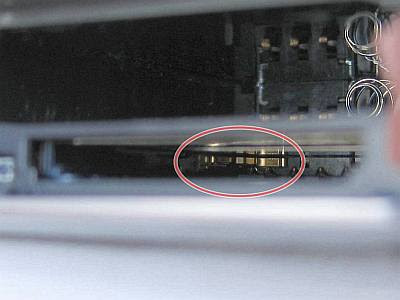
FIX 4: The famous "toothpick" fix (first presented here on DIY Digital Camera Repair). If you've tried the above techniques, and it's still showing locked, it's likely that the locking switch inside the camera's card slot is stuck. If you look inside the slot on the side of the slot where the SD card slide switch would be, you'll see a glint of gold color on the side. This is the camera's lock/unlock switch. The other glint's of gold that you may see at the far end of the slot are the reader's connectors (ignore those).
Camera's SD Card Lock/Unlock Switch

Somehow, the locking switch is making contact and has become stuck in the locked position (a single grain of sand can jam it there). With a plastic toothpick, or other skinny NON-METALLIC item, tap and gently push against this switch to see if you can jar open the contact to its normal unlocked position. Also try blowing compressed air at it, to clear out any gunk that may have worked its way in there, jamming it closed. Occasionally, reinsert the SD card to see if the issue has been corrected.
Fix 4A: The famous "tape" fix (sorry, I can't claim this one). If none of the above seems to work, or if you've found that you've broken the locking tab on the card, one final thing to try before opening the camera is good old tape. Cut a tiny piece of clear cellophane tape (use scissors to trim it), and place it tightly over the slot where the locking switch is, or was. I can't stress it enough, keep the piece of tape small, you don't want to jam your card in the camera. Now slide the card into the camera. If you encounter any resistance, STOP, the tape is likely too thick or too much. But if not, proceed and see if that corrects the problem.
FIX 5: If you've come this far and you're still getting a "card locked" error, it may be time to consider opening the camera to force open this switch, or to inspect its wiring (not recommended unless you have some familiarity with electronics). In this case please see this blog article instead (xscrewdriver, hope you don't mind me referencing your blog).
LOST PASSWORDS FIXES
Forgotten passwords can be recovered using the following procedures (from kioskea.net).
Lost Password Fix One:
1. Open the file manager of your mobile
2. In Settings choose system folders,
3. In the System folder, find a file called mmcstore
4. Send the file to your PC using IR/Bluetooth
5. Open the file in Notepad
6. The password you need for your memory card is located within that file
Lost Password Fix Two:
1. Insert your card into your phone, without accessing it through the phone
2. Run FExplorer and Open the path C:\system
3. Find the file called mmcstore, and rename it mmcstore.txt
4. Copy that file (mmcstore.txt) to your PC and open it in Notepad
5. Your password will be located within that file.
For Nokia Users with MicroSD :
Put the card in any E series mobile or N95 etc and format it. It will not ask for a password.


